Digitise Forms Foundation Tutorial
TUTORIAL OVERVIEW
This Digitise Forms Foundation Tutorial has been created with the aim of:
- Introducing you to Digitise Forms' key features and components.
- Getting you up-to-speed with Digitise Forms basics.
- Taking you through a series of easy-to-follow Online exercises (set out in an interactive Training Form, created using Digitise Forms).
- Guiding you through the steps involved in developing a Child Flu Vaccination Form.
- Allowing you to complete both the training exercises and the Child Flu Vaccination Form at your own pace.
- Providing resources that will help to facilitate and enable your own independent Digitise Forms product training.
- This tutorial can be completed either in your own environment (following the configuration instructions provided below) or in an NDL-provided virtual environment. Please contact your Account Manager for more information on obtaining access to the virtual environment.
Before you begin working your way through the training exercises, we recommend that you read through the exercise summaries to gain a sense of what you will be doing. This will also help you to understand the objectives of this Digitise Forms Foundation Tutorial. The exercise summaries can be found within the Day 1 and Day 2 drop-downs, located towards the bottom of the page. You can also access a PDF which contains an overview of the training exercises by clicking here.
Links to topics that contain more detailed information about Digitise Forms' components and features have been included within the exercise summaries, and we also advise reading through the linked content in order to further extend your knowledge.
- If you require assistance with any aspect of this Digitise Forms Foundation Tutorial, please email support@ndl.co.uk, starting the subject of your email with Digitise Forms Foundation Training to ensure it is picked up correctly. If you need further help, please contact your Account Manager.
Before you begin the exercises, you should also read through the information contained within the following drop-down which explains how to access training resources that have been made available to support your learning, and how to configure your environment:
- If you are following the training exercises in an NDL-provided virtual training environment, you can ignore the information contained within this drop-down and continue on to the exercise summaries.
In order to run this Digitise Forms Foundation Training within your own environment, you will need to access a working installation of Digitise Forms, Microsoft Word, and SQL Server. You also need to make sure that the following are all in place:
- Permission and access to run Form Studio.
- Permission and access to Publish Digitise Forms to an instance of IIS and SQL Server.
- An instance of Microsoft SQL Server Management Studio (or suitable alternative).
- A user account with permission to create databases on Publish, and read/write data to/from these.
If you experience problems with any of the above, please contact your Account Manager.
Download the Training Resources
As you work your way through the exercises, you will need access to a set of pre-existing resources which need to be configured within your own environment. These should be downloaded using the link provided below, then unzipped to a location on your machine. We recommend storing these in C:\Training Material\Digitise Forms\Resources.
- If you copy the resources to an alternative location, you will need to use this location instead of the one stipulated in the training materials.
Configure your SQL database
To set up the training database used during throughout the training exercises, on your SQL Server, you must make sure that you:
- Create a new database named Schools.
- Use the Schools.sql database script provided to create a SchoolOptions table within the database and pre-populate it with two test records.
- Throughout the training course, you will need to substitute your own SQL credentials for the sa user account specified in the training materials.
Once you have read through the exercise summaries, click on the following link to access the interactive Training Form:
The Summary drop-down at the bottom of this tutorial contains:
- A reminder of Digitise Forms' key components.
- An overview of what you will have learnt by the time you have completed the training exercises and have created the Child Flu Vaccination Form.
INTENDED AUDIENCE
This tutorial is aimed at anyone seeking to create and deploy eForms using Digitise Forms, but from a beginner's perspective. If you have prior knowledge of Digitise Forms, then you will probably be familiar with most of the information contained within this tutorial, in which case you will more than likely want to skip it in favour of the other, more component-specific tutorials. If, on the other hand, you are a new or novice Digitise Forms user, then we would advise completing the exercises and creating the Child Flu Vaccination Form before moving on to any of the other training topics.
APPROXIMATE COMPLETION TIME
It should take you approximately two days to complete the training exercises, but it may take you longer if you decide to re-visit some or all of the training materials, or if you read through all of the linked topics (which we recommend). How motivated you are when it comes to independent learning could also have an impact on how long it takes you to finish the exercises. For the exercise summaries, these have been grouped together within the following Day 1 and Day 2 drop-downs, as discussed above. You should aim to complete all of the exercises contained within the Day 1 drop-down on the first day of training, and all of the exercises contained within the Day 2 drop-down on the second day of training.
- An approach that you might like to follow when working your way through this tutorial is to read through the summary (and any linked content) for one exercise, then complete the exercise steps using the interactive Training Form while the summary information and the linked content is still fresh in your mind. Do the same for each subsequent exercise.
The Day 1 drop-down contains eight exercises, while the Day 2 drop-down contains seven exercises. Before you start the Day 2 exercises, you should read through the Day 2 Introduction, which includes instructions for making changes to the Child Flu Vaccination Form. The instructions typify the kind of development request that you are likely to receive when setting up a live Form. Note that because the Day 2 exercises don't contain as many instructions as the Day 1 exercises, the summaries for the Day 2 exercises are shorter than the Day 1 exercise summaries.
- As you work your way through the exercises and develop your Child Flu Vaccination Form, remember to save your changes. You will be prompted to do this at various points throughout the course of your training.
In this exercise, you will create the Form's Contact Details Page:
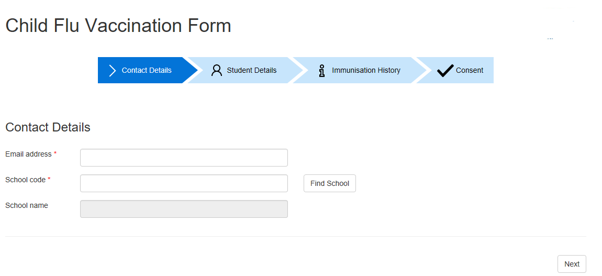
The main objectives of this exercise are:
- To add a Text Box to the Contact Details Page so that we can collect information.
- Add resources (e.g., an image) to your Form.
- Add a Navigation Button Element.
- Add some custom CSS in order to style the Form.
You will begin by opening Form Studio and creating a new Form Project. You will then start building up the Form by accessing and configuring some of its core components and working within the different areas of Form Studio, including:
- The Project Explorer Pane.
- The Form Design Workspace.
- The Properties Pane.
- The Status Bar.
- The Form Studio Ribbon.
You will give the Form a suitable name, and you will also add a number of Elements to the Form, including:
- A Title Element.
- An Image Element.
- A Label Element.
- A Text Box Element.
- A Separator Element.
- A Next Button Element.
You will also apply some custom styling to an Element and add a Required Rule, before naming and saving the Project.
In this exercise, you will create the Form's Student Details Page:
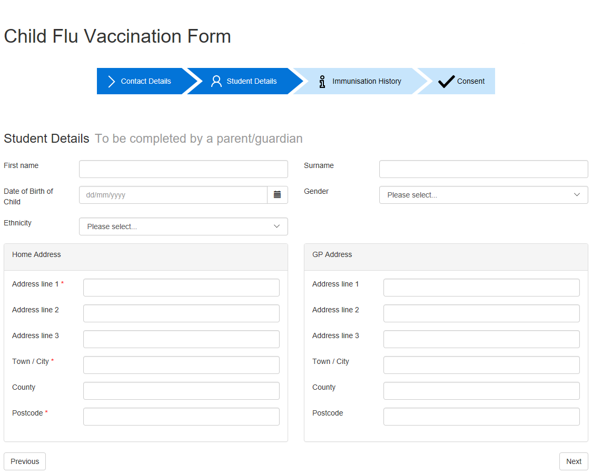
The main objectives of this exercise are:
- To create a Datasource.
- To map a Datasource to an Element.
- To create a Template.
In addition to the Elements that were added in Exercise 1, you will also add:
- A Date Picker Element.
- A Drop List Element.
- A Spacer Element.
- An Address Finder Element.
- A Previous Button Element.
In this exercise, you will create the Form's Immunisation History Page:
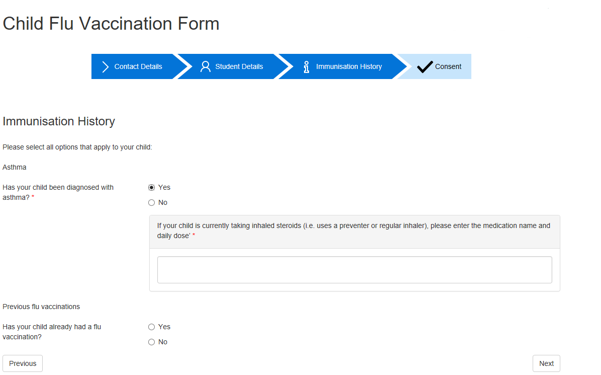
The main objectives of this exercise are:
- To hide an Element.
- To write a JavaScript Expression.
- To use a Template.
In addition to the Elements that were added in previous exercises, you will also add:
- A Radio List Element.
- A Text Panel Element.
In this exercise, you will create the Form's Consent for Immunisation Page:
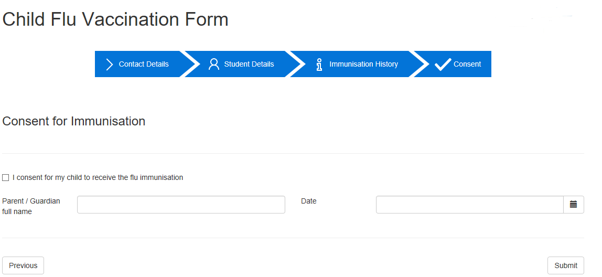
The main objectives of this exercise are:
- To add a Submit Button Element.
- To change an Element's colour theme using options available within the Properties Pane.
You will also add a Checkbox Element and an 'Arrows' Navigation Bar Element.
Exercise 5 is comprised of two parts. Part A deals with setting up the Form's Success Page, while Part B deals with setting up the Form's Failure Page. See the separate drop-downs, below, for more information.
In this part of Exercise 5, you will create the Form's Success Page:
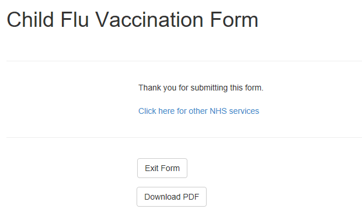
The main objectives of this part of Exercise 5 are:
- To use a redirect button.
- To create the Success Page.
A Link Element will be added to the Form which will include the URL for the main NHS UK website, along with a Button Element. When clicked, the link will take the user to the https://www.nhs.co.uk location, which will open in a new tab. You will also learn about button events. Note that the Download PDF button, shown above, is covered in a later exercise.
In this part of Exercise 5, you will create the Form's Failure Page:

The main objectives of this part of Exercise 5 are:
- To use an email redirect link.
- To create the Failure Page.
You will also toggle the Design/Preview Mode option within the Form Studio Ribbon. This will allow you to preview the Form before it's Published (covered in the next exercise).
In this exercise, you will Publish and test your Form. The main objectives of this exercise are:
- To configure a Publishing Profile (as illustrated below).
- To successfully Publish your Form.
- To successfully write to the database.
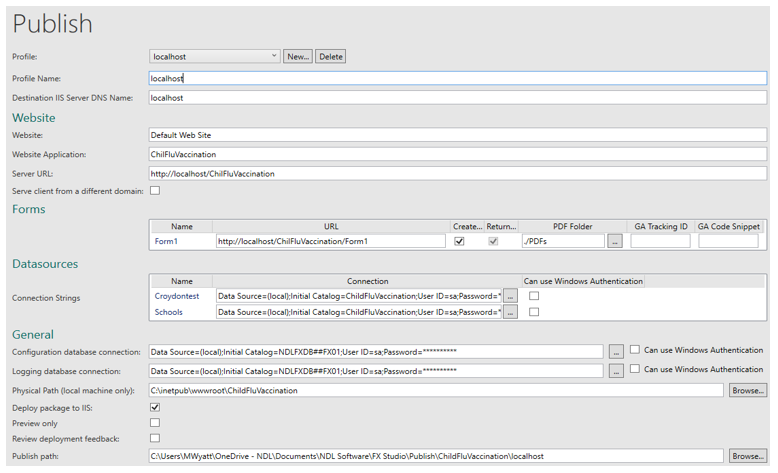
- Before you attempt this exercise, you must make sure that you run your Form as an administrator. See Publish to Your Local Machine within the Publish Your Form topic for more information.
The exercise includes detailed steps for configuring the Publishing options.
In this exercise, you will add a School Code Lookup:

The main objectives of this exercise are:
- To import a Datasource.
- Create a new query in your Datasources.
- Add a button to perform the Datasource Lookup.
As part of this exercise, you will open Microsoft SQL Server Management Studio and add a school name (of your choosing) to the Schools database.
In this exercise, you will configure your Form to generate a PDF:
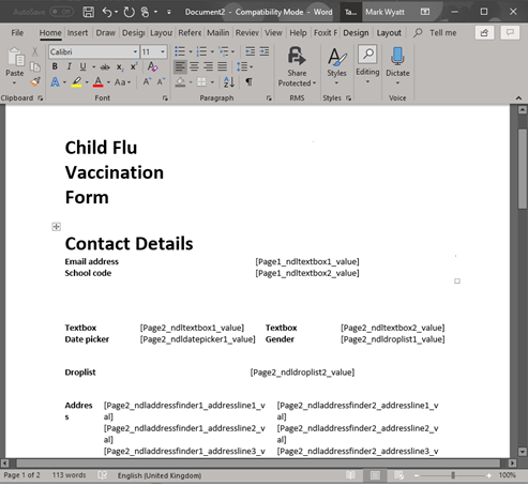
The main objectives of this exercise are:
- To generate a Word template.
- To customise the template.
- To successfully generate PDFs.
As part of this exercise, you will configure a number of options that will allow a PDF to be generated, based on the Form's contents.
Three months have passed since you published your Child Flu Vaccination Form for the Vaccination Department. The Form has been a great success, and the Vaccination Department have put forward a request for the Form to be enhanced by incorporating some extra features. They would like to add an additional question to the Form, and implement some data validation. They would also like the Form to be styled so that it mirrors the appearance of other eForms within the organisation (using the company's standard stylesheet).
To enable you to carry out the above enhancements, your manager has sent you the following instructions:
- Use the organisational stylesheet provided to ensure your Vaccination Form carries the same branding (i.e., font, colours, etc.) as the other organisational forms.
- Add a feature that allows the Parent or Guardian completing the Form to select from a list of Titles/Prefixes when entering their name.
- The Vaccination Department have noticed that the Form allows the Parent/Guardian to enter any value into the School Code Element after the lookup has been done. There are only 8 schools in this district, so we need a way of ensuring that the School Code is a value between 1 and 8. Add validation to the School Code Element to enable this.
- Update the Ethnicity drop-down so that it contains more options. We also need the options to be displayed in alphabetical order to make it easier to find the Ethnicity.
- Add an additional question that allows the Parent/Guardian to select any other medication their child is taking. The Vaccination Department have provided you with a list of medicines they would like displaying on the Form. Ensure there is an option to choose ‘Other’ and when this is selected, we want to display a Textbox allowing the user to enter any medication not listed.
- Automatically capture the date on which the Form was submitted.
- Before you begin this Day 2 block of exercises, we advise taking some time to recap on what you did during the first day of your training.
The main objectives of this exercise are:
- To import a stylesheet.
- To apply styles to Elements.
This exercise will take you through using a stylesheet and downloading an image to be used as part of the Form's branding.
The main objectives of this exercise are:
- To use the Complex Name Element.
- To update Datasources.
This exercise will take you through replacing a Text Box Element with the Complex Name Element. It will also take you through removing a Datasource and then adding a new one. You will also create a new PDF of the Form's data to reflect the changes.
The main objectives of this exercise are:
- To use a Regular Expression.
This exercise will take you through using a Regular Expression to limit the values that can be entered in a Text Box Element. See the Validate User Input topic for more information. The Regular Expression will be applied using the Rules tab for the Text Box. The following article contains information on Regular Expressions, which you might find useful:
The main objectives of this exercise are:
- To add extra Ethnicity options to the Form using SQL Server Management Studio.
- To create a new SQL Query to order the Ethnicity table.
The main objectives of this exercise are:
- To create a new table in SQL Server Management Studio.
- To import the new table into Form Studio.
This exercise will take you through adding and configuring a table using SQL Server Management Studio. It will also ask you to add a Check List Element to the Form, and to map the required data to it.
The main objectives of this exercise are:
- To use JavaScript to obtain the current date.
- To display the date in the relevant Form Studio Element.
Useful JavaScript code snippets explaining how to obtain the current date can be found Online, including:
The main objectives of this exercise are:
- To use the Edge Developer tools to debug JavaScript syntax errors.
- To use the Digitise Forms' Log table to identify database errors.
This exercise will take you through forcing a syntax error in your custom JavaScript function. It will also encourage you to use the browser Developer Tools to help debug the error, and to locate and then use the Log table associated with the Digitise Forms NDLFXDB Configuration database.
This Digitise Forms Foundation Tutorial has taken you through the steps that you would typically need to follow when setting up a live Form within your own environment. It has discussed how to create, save, and Publish a Form, and how to make use of common Form Studio Elements.
It has also explained:
- How to correctly use Datasources.
- How to map Form Elements to data held in database tables.
- How to create PDF copies of your Forms.
- How to navigate between a Form's pages.
- How to incorporate images and apply styling in order to enhance a Form's appearance.
- How to carry out data validation and de-bugging.
In addition to acquiring the above knowledge, by working through the exercises using the interactive Training Form, you will hopefully have also realised the benefits of using Digitise Forms to accurately and reliably display and capture information for a variety of different purposes (including training).
As discussed in this Online Help's main Training topic, we welcome any feedback that you care to provide regarding how our Online Learning offering can be improved.
See also: